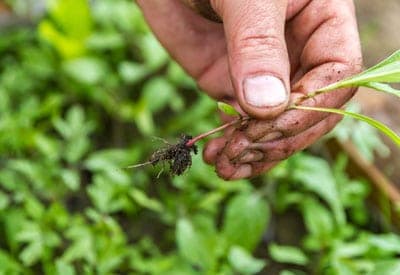
What’s the hardest thing — at least for us — to do when vegetable gardening? Thinning crowded seedlings. We’ve worked so hard to prepare our soil and get seeds in the ground. Now here they come, all crowded together and struggling against their too-close neighbor. We know that if we want our plants, be they lettuce, radishes, or green beans, to grow quickly and be healthy, we’ve got to get in there and cull the herd. But, but… they’re our little plants! They represent our hopes and dreams! Can’t we just let them go and see what happens?
No. Now is not the time for sentimentality. Crowded plants not only discourage growth, they encourage pests and disease. Crowded seedlings shade each other from the sun. As they get larger, it only gets worse. Crowded root vegetables, including turnips, beets, and radishes, won’t develop useable roots if they’re crowded.

#1 ROW COVER
Harvest-Guard
Floating row covers let in sun, water and air... but keep bugs out! Protects to 26°F.
Learn moreMade of premium grade spun-bond polyester, Harvest-Guard Floating Row Cover has “pores” large enough to let in sunlight, water and air, but small enough to keep out insect pests. Single layer protects as low as 29°F; double layer protects as low as 26°F.
The earlier you thin your freshly germinated garden plants, the faster they’ll grow. We’ve recommended gradual thinning in the past, as well as using thinning as a means of collecting greens for the first spring salad. But really, you don’t want to wait that long. Give each little plant its space (check seed packages for spacing suggestions). If plants such as carrots are too close and tangled to remove by plucking, use scissors. Tweezers can be handy for those particularly delicate jobs. And don’t just thin once. Go back after a week or so and make sure each of your little treasures has the space to do its best. This second thinning might be the time to collect young vegetables for a garden salad.
Here’s a cute little video on thinning plants … notice the photo collage that begins the video (from North Carolina). That looks like a great community garden.
You can make the chore of thinning easier by using careful planting techniques when sowing seed. Side show: We’ve noticed that many garden books brush over the topic of seeding or avoid it all together. But how you seed can be critical. Plant at the depth recommended on the seed package (here’s a chart that can help). Be sure you tamp down the soil where you’ll be planting. In our little garden, this meant using a broom stick or a rake handle (be careful if the rake is still attached) and pressing down firmly, even walking on it, to make a short trough. After the seeds are in the trough, cover them to the recommended depth and tamp down firmly (but not too firmly). Water thoroughly making sure the spray is not so hard as to wash away the soil.
But you know all that. How do you insure good spacing between plants when sowing seed? With large seed — beans, squash, pumpkins, corn — it’s easy to do by hand. If you have a large garden you might want to invest in a walk behind seed planter or stab planter. But for most of us, hand sowing is the norm. And tiny seeds — lettuce, even tomatoes — this can be difficult. For pin-point planting, Renee Shepherd likes to moisten the tip of a pencil, touch a seed so that it clings to the pencil tip, and then push it into the ground. This is great for something like tomatoes, of which you’re not planting so much of (and we usually start our tomatoes indoors anyway).

Those tiny lettuce seeds? Mix them in a can with a couple three tablespoons of coarse sand and then sow a pinch at a time. This not only adds some space between the seeds, it also helps you see how far down the row you’ve gone.
Our favorite technique for lettuce is not to plant a row but to plant squares — you know, the old square-foot gardening technique — though our squares are a little larger. We sow the seeds from the corner in, then lightly run over the square with our palm to (hopefully) distribute the seed more evenly. Then cover with hand sprinkled compost or soil and tamp. Luckily, lettuce shouldn’t be planted too deeply.
When planting seed mixes (mesclun) we don’t worry too much about immediate thinning. Some plants will grow faster than others and as they’re removed, others grow up to take their place. Do thin if there’s an especially crowded place. Otherwise your plants will grow long and leggy, not exactly what you want for salad greens.


